
Who this is for: teachers and managers
Available to: teachers on paid subscriptions. Logging in as your student works on all subscriptions. Managing accounts from the Enterprise Management Panel needs a paid multi-teacher subscription. If your district rosters through Clever or ClassLink, adding, removing and moving teachers and students is done there instead. See Rostering via SSO (Clever and ClassLink).
Before you start: students added to your account.
Contents
As a teacher
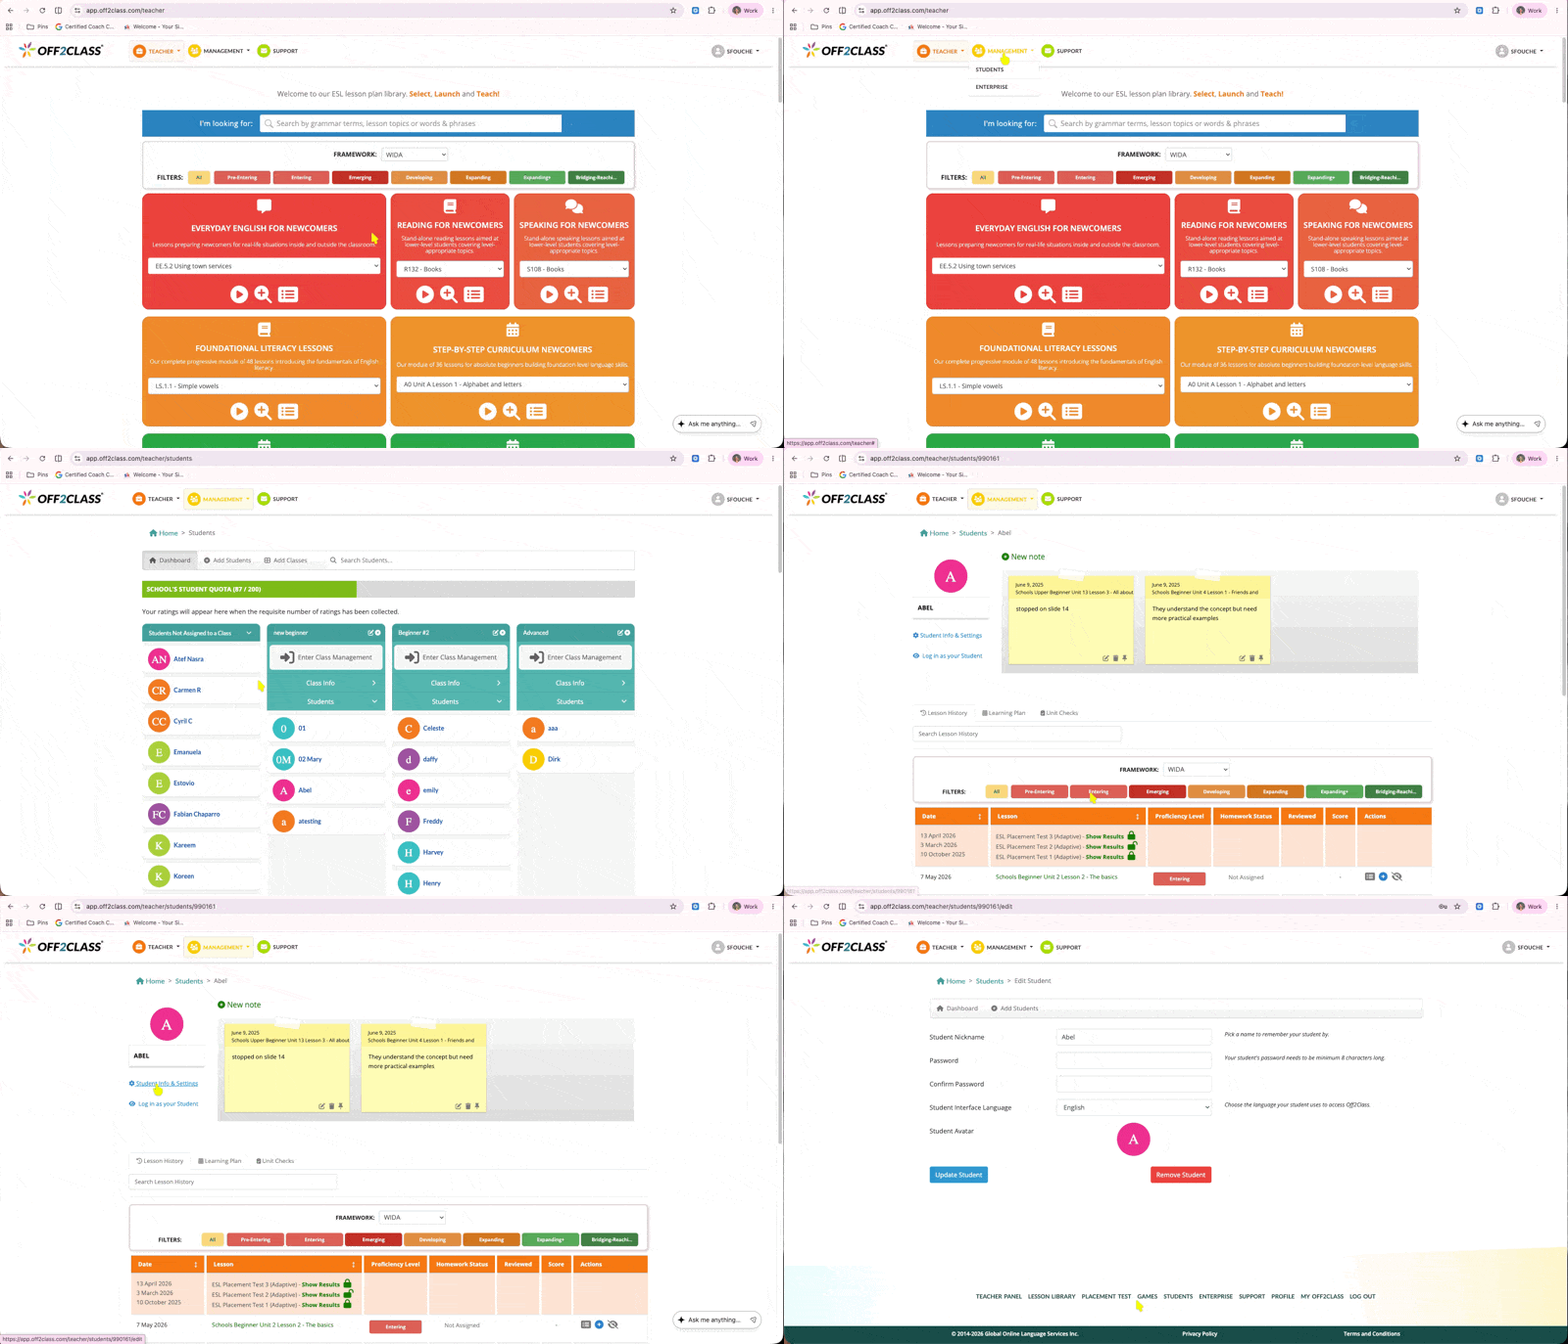
You make every change to a student's account from their Student Info & Settings page in the Student Management Panel.
Edit a student's details
- Go to the Student Management Panel.
- Select the student's name.
- Select Student Info & Settings.
- Change any of these fields:
- Student Name
- Student Email
- Do not send email notifications
- Student Interface Language
- Select Update Student.
Result: the student's profile shows the new details.
Reset a student's password
- Go to the Student Management Panel.
- Select the student's name.
- Select Student Info & Settings.
- In Password, enter a new password of at least eight characters. If a "blacklisted password" message appears, the password is too weak, so choose a stronger one.
- Enter it again in Confirm Password.
- Select Update Student.
Result: the student logs in with the new password.
Students can also reset their own password with Lost Password on the login page.
Log in as your student
If a student says they can't see a lesson or an assignment, log in as them to check what they see before you change anything.
- Go to the Student Management Panel.
- Select the student's name.
- Select Log in as your Student.
Result: you see Off2Class the way the student does, including their to-do assignments, completed work and lesson slides.
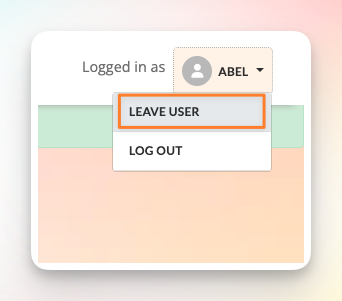
When you're done, open the menu next to Logged in as at the top right and select Leave User.
As a manager
You manage student and teacher accounts from the Enterprise Management Panel. If you also have the teacher role, open the Management menu: Enterprise opens the Enterprise Management Panel and Students opens your teacher view.
Edit a student's details
- Go to the Enterprise Management Panel.
- Select the Students card.
- Select the student's name.
- Change any of these fields:
- Student Name
- Student Email
- Password
- Student Interface Language
- Student Identifier: optional, for matching the student to their record in your Student Information System (SIS)
- Select Submit.
Result: the student's record shows the new details.
Reset a student's password
You can send students a password reset email, or set a new password yourself.
To send a reset email to one or more students:
- Go to the Enterprise Management Panel.
- Select the Students card.
- Select the checkbox next to each student.
- Under Bulk actions, select Reset password.
- Select Submit, then select OK.
Result: each student gets an email with a link to set a new password.
To set a new password yourself:
- Go to the Enterprise Management Panel.
- Select the Students card.
- Select the student's name.
- In Password, enter a new password of at least eight characters. If a "blacklisted password" message appears, the password is too weak, so choose a stronger one.
- Select Submit.
Result: the student logs in with the new password.
Log in as a student
- Go to the Enterprise Management Panel.
- Select the Students card.
- Next to the student's name, select Login as.
Result: you see Off2Class the way the student does, including their to-do assignments, completed work and lesson slides.
When you're done, open the menu next to Logged in as at the top right and select Leave User.
View teachers
- Go to the Enterprise Management Panel.
- Select the Teachers card.
Result: you see every teacher on your account, with:
- the teacher's name and email address
- how many students they have and the most they can have (student capacity)
- the classes they teach
- Login as, to log in as the teacher
To show 25 or 50 teachers on each page instead of 10, change the Per Page value. If your teachers run across several pages, use the page numbers under the list.
Edit a teacher's details
- Go to the Enterprise Management Panel.
- Select the Teachers card.
- Select the teacher's name.
- Change the Name, Email, Password or Max Students field.
- Select Submit.
Result: the Teachers list shows the new details.
Reset a teacher's password
This sends each teacher an email with a link to set a new password themselves. To set a password for a teacher instead, change the Password field on their page, as in Edit a teacher's details.
- Go to the Enterprise Management Panel.
- Select the Teachers card.
- Select the checkbox next to each teacher.
- Under Bulk actions, select Reset password.
- Select Submit, then select OK.
Result: each selected teacher gets a reset password email.
Log in as a teacher
Logging in as a teacher shows you their students' Placement Test results and their activity: when they last logged in, which lessons they opened, which students they worked with and how long they spent in lessons.
- Go to the Enterprise Management Panel.
- Select the Teachers card.
- Next to the teacher's name, select Login as.
Result: you see Off2Class the way the teacher does.
When you're done, open the menu next to Logged in as at the top right and select Leave User.
Change how many students a teacher can have
To change it for one teacher, edit the Max Students field on their page. To change it for several teachers at once:
- Go to the Enterprise Management Panel.
- Select the Teachers card.
- Select the checkbox next to each teacher.
- Under Bulk actions, select Change max students.
- Select Submit.
- Enter the most students each teacher can have at once.
- Select Apply.
Result: the # Students / max column shows the new limit.
Remove a teacher
- Go to the Enterprise Management Panel.
- Select the Teachers card.
- Select the teacher's name.
- Select Remove User.
Result: the teacher no longer appears in your Teachers list.