
Who this is for: teachers and managers
Available to: teachers on all subscriptions. Adding students as a manager needs a paid multi-teacher subscription.
Before you start: a unique email address for each student and a password of at least eight characters. To import students in bulk, you also need the teacher and class details you want to assign.
Important: if your account is rostered through SSO, manual rostering of teachers, students and classes is turned off. Ask your coordinator or IT contact to add the student for you. See Rostering via SSO (Clever and ClassLink).
Contents
As a teacher
These steps create a new student account. To put a student who already has an account into a class, see Add, manage and remove a class.
Use this route if you teach on your own account. Teachers add students one at a time. A student account lets you enroll the student in a live lesson. It also gives the student their own login, so they can review past lessons and work through homework and assessments between classes.
Result: the student appears in your student list and can log in with the email address and password you entered.
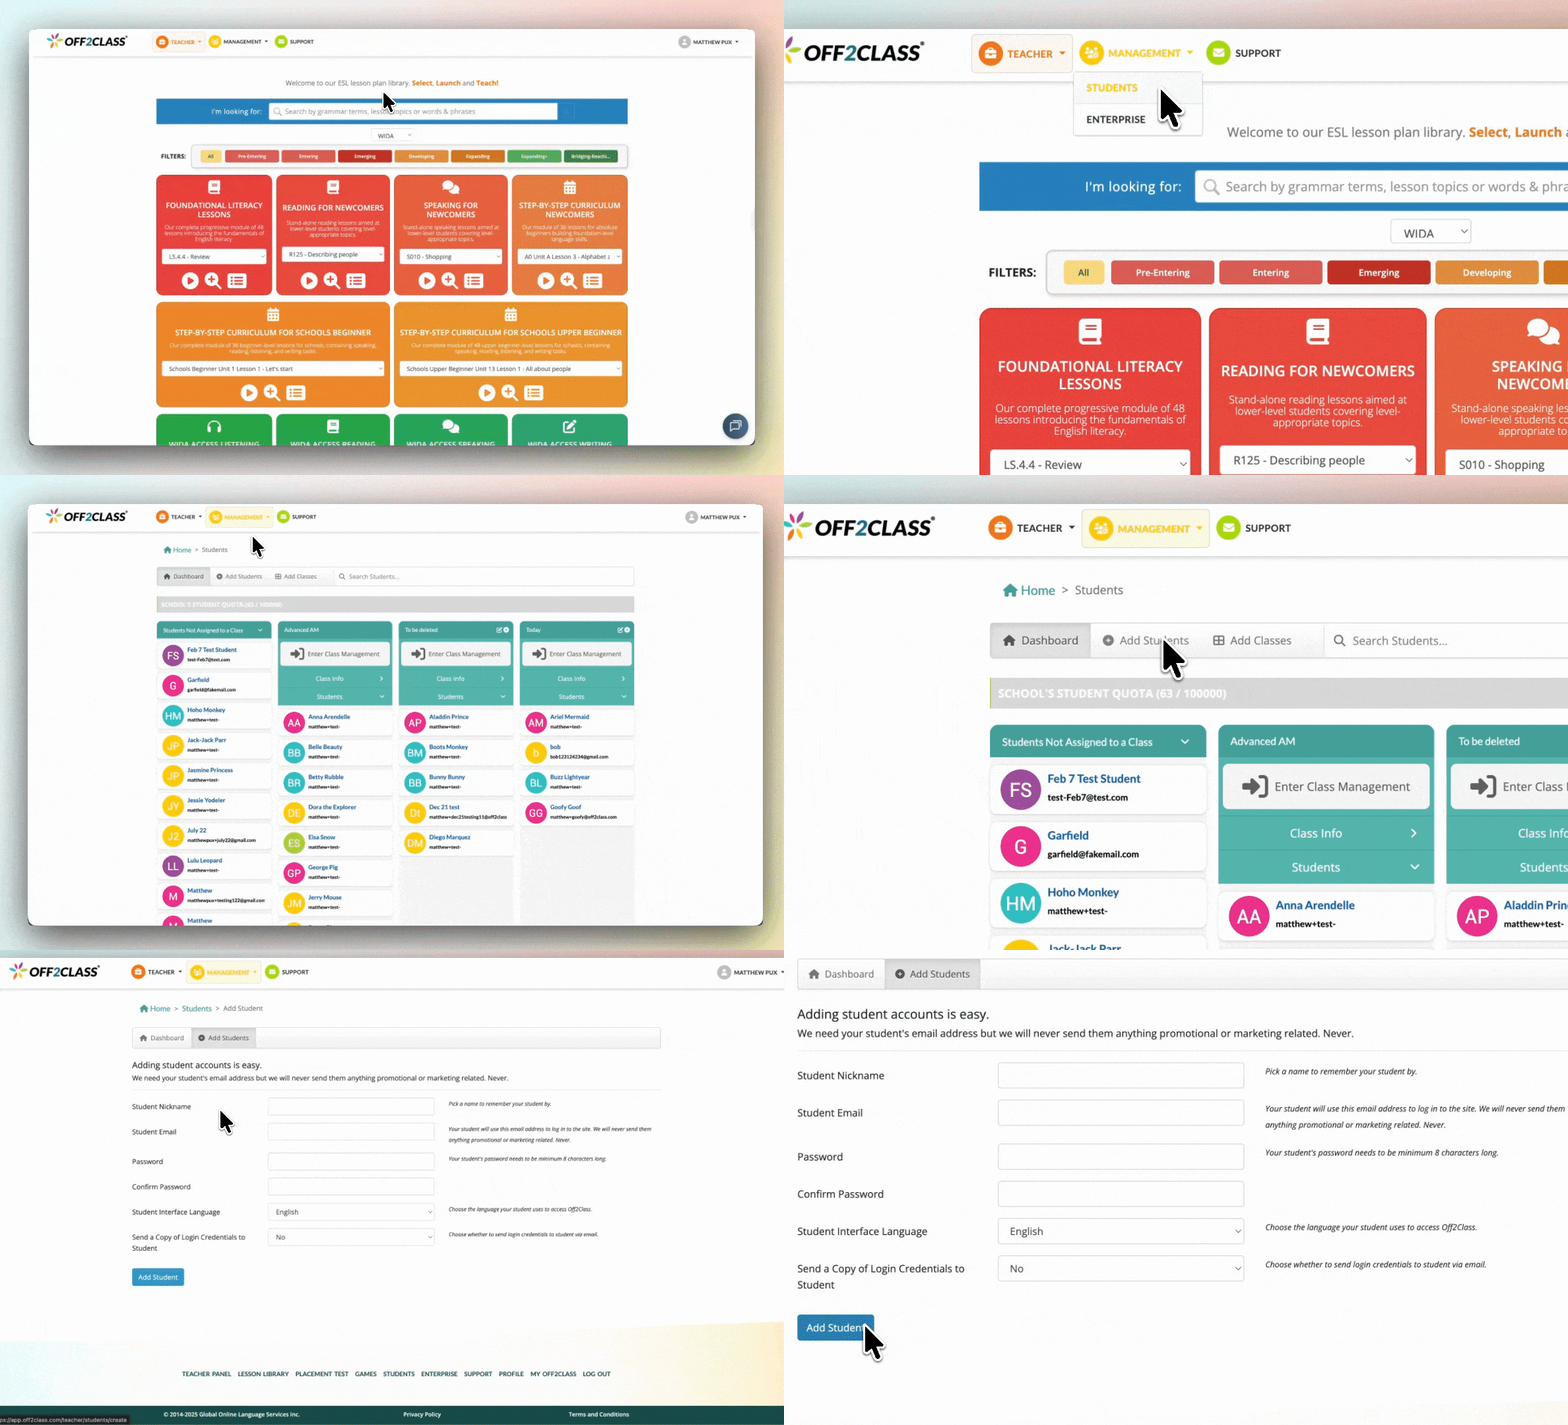
- Go to the Student Management Panel.
- If you also have the manager role, open the Management menu and select Students.
- Select Add students.
- Complete the fields, then select Add student.
- Name: the student's full name.
- Email: the student's email address.
- Password: at least eight characters. The student uses it to log in to Off2Class.
- Student Interface Language: translates the text on the student's home page so they can navigate it. Lesson content stays in English.
- Send a Copy of the Login Credentials to Student: select Yes to email the student their login details. The default is No, which means you pass the email address and password to the student yourself.
Result: the student appears in your student list and can log in with the email address and password you set.
You can also add a student the first time you assign the Placement Test.
If a message appears about transferring or reactivating the student, see Transfer or reactivate a student.
As a manager
Use this route only if you manage a multi-teacher account. If you do not see Management in your menu, your account does not have this panel, and the teacher steps above are the ones to follow.
Managers add students from the Enterprise Management Panel, one at a time or in bulk from a CSV file.
Add students one at a time
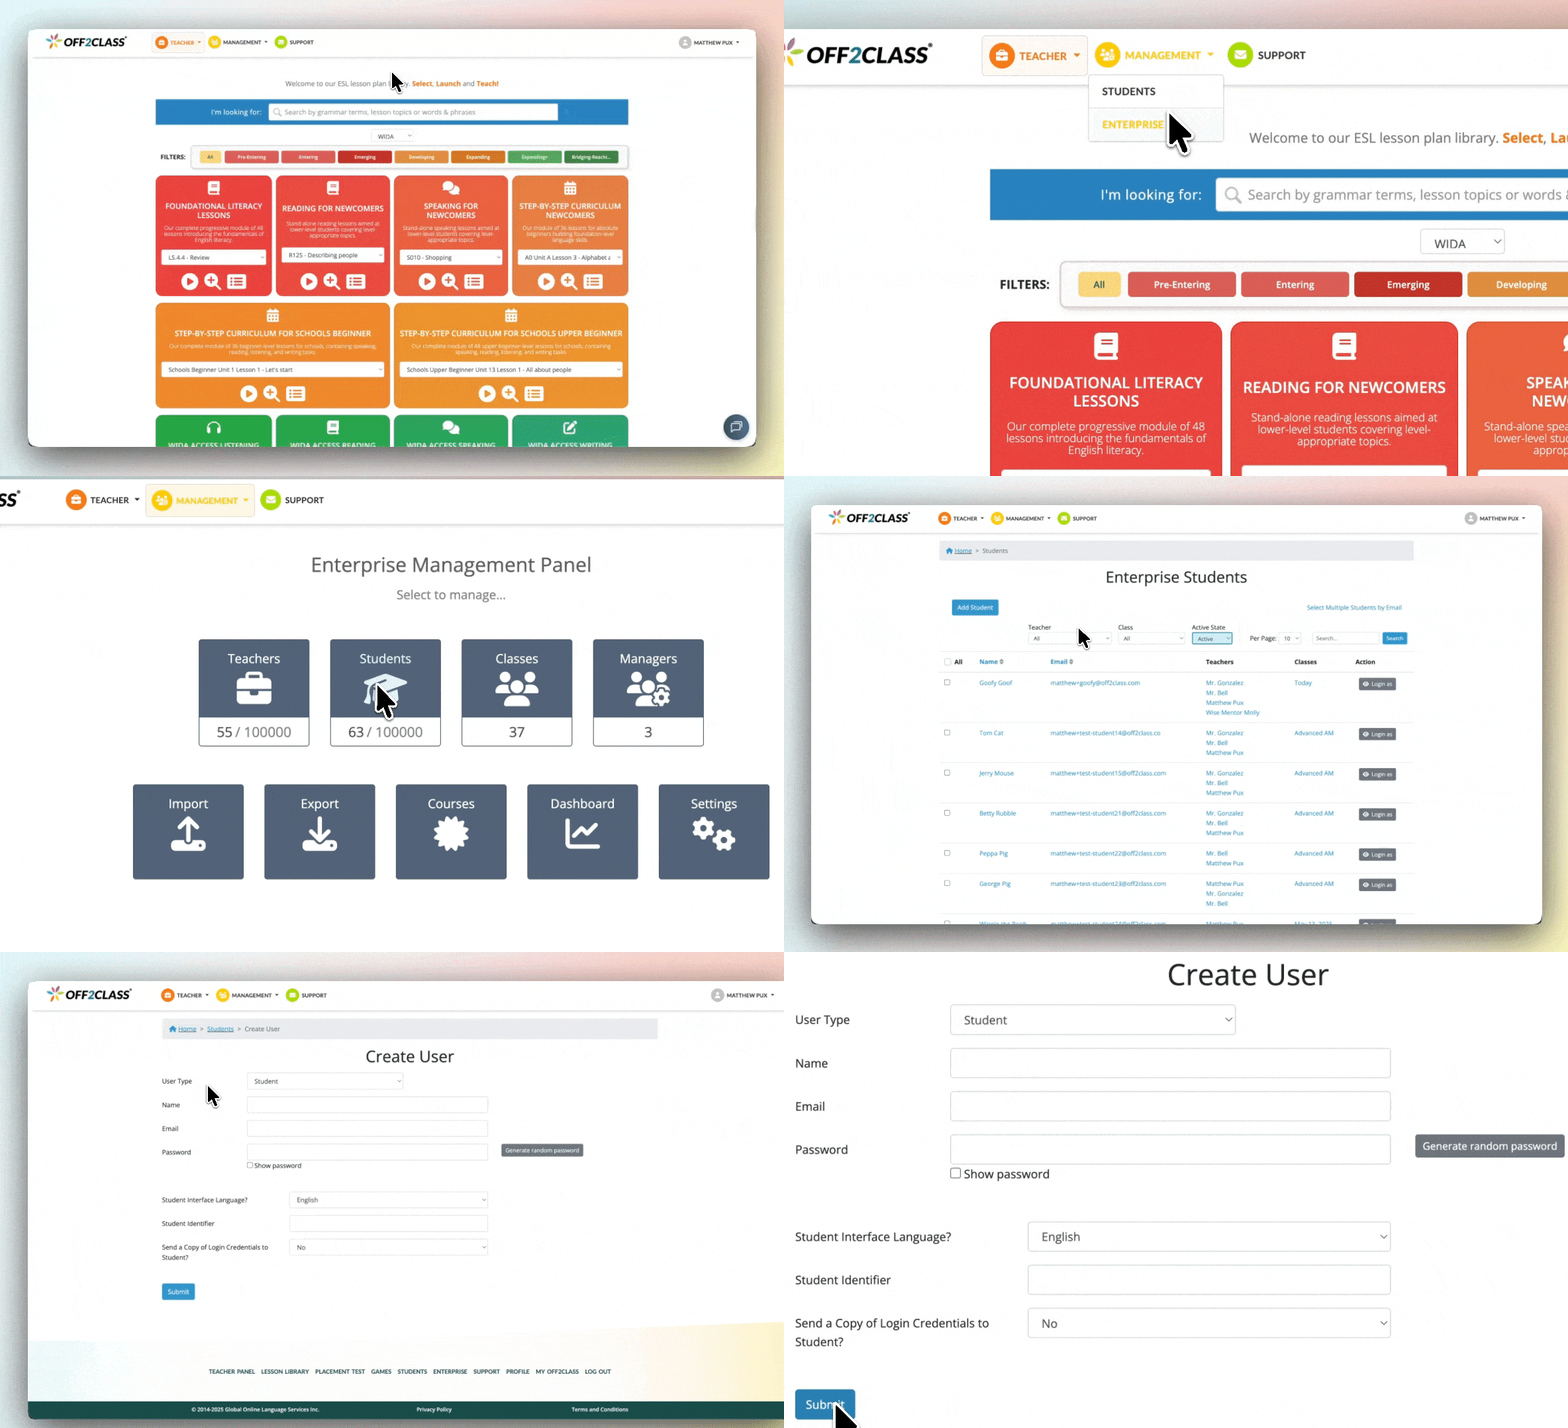
- Go to the Enterprise Management Panel.
- If you also have the teacher role, open the Management menu and select Enterprise.
- Select the Students card.
- Select Add student.
- Complete the fields, then select Submit.
- Name: the student's full name.
- Email: the student's email address.
- Password: at least eight characters. The student uses it to log in to Off2Class.
- Student Interface Language: translates the text on the student's home page so they can navigate it. Lesson content stays in English.
- Student Identifier: optional. An identifier that matches the student to their record in your Student Information System (SIS). It takes up to 25 characters.
- Send a Copy of the Login Credentials to Student: select Yes to email the student their login details. The default is No, which means you pass the email address and password to the student yourself.
Result: the student appears in your enterprise student list. You get an email with the student's login details.
Add students in bulk
One import can both create new students and update students who are already in your enterprise.

Start by building the file.
- Go to the Enterprise Management Panel.
- If you also have the teacher role, open the Management menu and select Enterprise.
- Select the Import card.
- Select Go to Import Students.
- Select Download CSV Template. The file has the six columns the importer reads.
- Open the file and add one student per row.
- Complete the required columns.
- Student Email: the address the student signs in with. Each row needs a different one.
- Teacher Email: the teacher you want to assign the student to. The teacher must already be in your enterprise.
- Student Name: the student's full name, shown across Off2Class. Optional for existing students. Keep the column and leave the cell blank.
- Student Password: at least eight characters. The student signs in with it. Optional for existing students. Keep the column and leave the cell blank.
- Optional: complete the optional columns.
-
- Student Class Name: the class you want to assign the student to. If a class with exactly that name exists, the student is added to it. If not, the import creates it. Leave it blank to assign no class.
- Student Identifier: your own reference for the student, up to 25 characters. Use it to match the student to their record in your Student Information System (SIS)
Important:
- Column names must match exactly, including capitals. Any other columns in your file are ignored.
- Keep every column header in the file, even where a row has nothing in it. A file with headers missing can fail to import.
- To assign several teachers to one student, create the class in Off2Class first and assign the teachers to it. Then enter that class in the Student Class Name column.
- Remove stray spaces, line breaks and trailing characters. These are a common cause of import errors.
Result: your file is ready to upload.
Then upload the file and check what the importer is going to do before you apply it.
Important: Overwrite and Unassign can take a teacher or a class away from a student who is being taught on your account right now. Nothing is applied until you select Apply Import, so check every assignment option before you do. Select Add if you aren't sure.
- Under Import file, select Choose file and open your CSV file. You can also drag the file into the box.
- Select Upload.
- On the Import Students Preview screen, the summary at the top tells you how many students the import will create, update or send a transfer request to. Review the students in each group.
- New students: not registered on Off2Class yet. The import creates them.
- Already registered on Off2Class: registered on Off2Class but not in your enterprise. The import sends each one a transfer request. If you'd rather not, give the student a different email address in your file and import them as a new student.
- Existing students, details will change: already on your account. The import updates them with what your file says.
- For students in the Existing students, details will change group, select how the import treats their current teacher and class assignments. Use Change all to set the same option for the whole group, then change the dropdown on any row that needs something different. Where a value is changing, the row shows the current one in grey above the new one in bold, so you can see exactly what each student will lose or gain.
- Add: keeps the current teacher and class and adds the ones in your file. If a match already exists, the import skips it rather than adding it twice.
- Overwrite: replaces the current teacher and class with the ones in your file. If a match already exists, the import skips it rather than adding it twice.
- Unassign: removes the student's teacher and class. The student stays in your enterprise.
- Select Apply Import.
Result: new students are created, students registered elsewhere are sent a transfer request and students already in your enterprise are updated with the assignment option you chose.
Notes and limits
Note: there isn't a class code or join link. Students don't sign up themselves. You add each student, and each one gets their own login.
Note: an import doesn't send students their login details, whether it creates them or updates them. You pass those on yourself.
Note: a student who is already registered on Off2Class but isn't in your enterprise needs a transfer request before you can teach them. The same goes for a student whose account was deactivated. See Transfer or reactivate a student.
Tip: build the file in whichever spreadsheet tool you already use. The importer reads it correctly as long as you started from the template and saved it as a CSV.