
Who this is for: teachers and managers
Available to: teachers on paid subscriptions. Managing classes as a manager needs a paid multi-teacher subscription. If your district rosters through Clever or ClassLink, classes and students are managed there instead of in Off2Class. See Rostering via SSO.
Before you start: students added to your account.
Contents
As a teacher
Add a class
On a multi-teacher account, if a class you expect isn't in your roster, you can add it yourself or ask your manager.
- Go to the Student Management Panel.
- Select Add Classes.
- Enter a name for the class, then select OK.
Result: the new class appears next to Students Not Assigned to a Class.
Add or remove students
Students don't join a class with a code or link. You add each student to your account first, then put them in a class. See how to add a student.
- Go to the Student Management Panel.
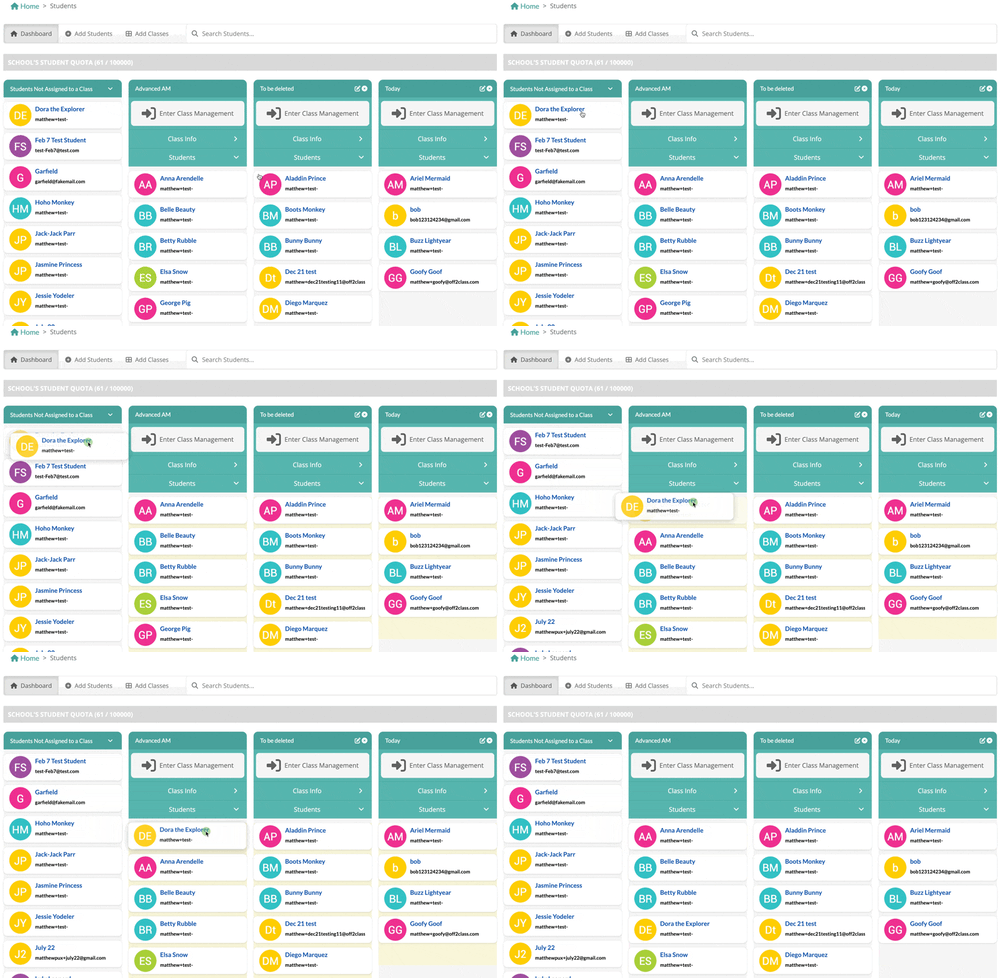
- Drag the student from Students Not Assigned to a Class into the highlighted area of the class.
Result: the student appears in the class.
To move a student to another class, drag them into that class. To remove a student from a class, drag them back into Students Not Assigned to a Class.
A student can only be in more than one class on a paid multi-teacher subscription, and your manager sets that up. When a student is in classes with different teachers, each teacher can assign work and see all of the student's work, including work the other teacher assigned.
Students are listed in number and alphabetical order. To show them in a set order, edit the student names or add a number to each.
Rename a class
If you don't see a pencil icon on the class, only your manager can rename it.
- Go to the Student Management Panel.
- On the class, select the pencil icon.
- Enter the new name, then select OK.
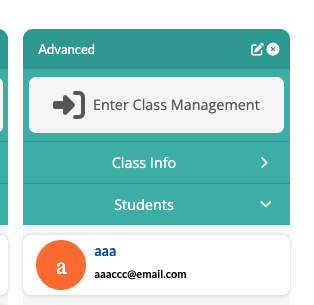
Result: the class shows its new name.
Delete a class
If you don't see an X on the class, only your manager can delete it.
Important: deleting a class permanently removes its records, and they can't be recovered. The students themselves aren't deleted.
- Go to the Student Management Panel.
- Next to the class name, select the X.
- Select OK.
Result: the class is removed, and its students move to Students Not Assigned to a Class.
As a manager
Add a class
- Go to the Enterprise Management Panel.
- Select the Classes card.
- Select Add Class.
- In Name, enter a name for the class.
- Optional: to stop teachers from renaming or deleting the class, clear the Is Editable checkbox. It's selected by default.
- Select Submit.
Result: the new class appears in the class list.
To create several classes at once, add them when you import teachers.
View classes
- Go to the Enterprise Management Panel.
- Select the Classes card.
Result: you see every class on your account, with:
- the class name
- the teachers assigned to it
- the number of students in it
You can search by class name, and select several classes at once for bulk actions. To show 25 or 50 classes on each page instead of 10, change the Per Page value. If your classes run across several pages, use the page numbers under the list.
Add or remove students
- Go to the Enterprise Management Panel.
- Select the Students card.
- Select the checkbox next to each student, or use Select Multiple Students by Email.
- Under Bulk actions, select Add class.
- Select Submit.
- Select the class, then select Apply.
Result: the students are added to the class.
Add class keeps each student's current classes, so a student can be in more than one class. When the classes have different teachers, each teacher can assign work and see all of the student's work. To move students to a different class instead, use Change class. To take students out of a class, use Remove class.
Rename a class
- Go to the Enterprise Management Panel.
- Select the Classes card.
- Select the class you want to rename.
- Enter the new name, then select Submit.
Result: the class shows its new name in the list.
Add, change or remove teachers
Add teacher keeps the class's current teachers. Change teacher replaces them. Remove teacher takes a teacher off the class.
- Go to the Enterprise Management Panel.
- Select the Classes card.
- Select the checkbox next to each class.
- Under Bulk actions, select Add teacher, Change teacher or Remove teacher.
- Select Submit.
- Select the teacher, then select Apply.
Result: the class list shows the updated teachers.
Delete a class
Important: deleting a class permanently removes its records, and they can't be recovered. The students themselves aren't deleted.
- Go to the Enterprise Management Panel.
- Select the Classes card.
- Select the checkbox next to each class you want to delete.
- Under Bulk actions, select Delete Class.
- Select Submit.
- Select Delete.
Result: the classes are removed from the list. Their students stay on your account.